Pillar Jib Crane Installation: Foundation to Commissioning
Overview of Pillar Jib Crane
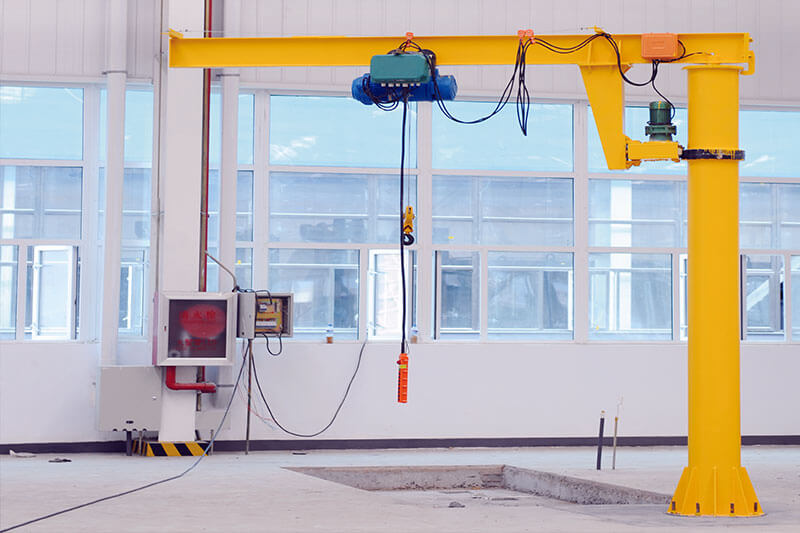
A pillar jib crane is a type of lifting equipment mounted on a vertical pillar. It’s commonly used in factories, warehouses, and workshops where there’s a need for heavy lifting in tight spaces. The crane consists of:
- A rotating arm (cantilever) for load movement
- An electric hoist for lifting heavy objects
- A sturdy base mounted on a strong foundation
This crane type is designed for tasks that require precision and flexibility, especially in confined spaces.
Pillar jib crane, floor mounted pillar jib crane for sale
Importance of Proper Installation
Proper installation ensures the crane works safely and efficiently. A faulty setup can lead to:
- Instability: The crane may be at risk of tipping over or malfunctioning.
- Inefficiency: Poor alignment can result in uneven lifting or excessive wear on parts.
- Safety hazards: Improper installation may lead to accidents or injuries.
It’s essential to get the installation right from the start to avoid these issues and ensure the crane operates smoothly for a long time.
Key Objectives of the Guide
This guide will cover the full process of installing a pillar jib crane. The main objectives include:
- Foundation Construction: Step-by-step instructions on preparing a solid foundation.
- Assembly: Detailed guidance on assembling the crane’s pillar, arm, and hoist.
- Commissioning: A focus on testing the crane to ensure proper function before use.
By following this guide, you’ll be able to install the pillar jib crane correctly, ensuring safety, efficiency, and long-term durability.
Foundation Construction for Pillar Jib Crane
Understanding the Foundation Requirements
Purpose of Embedded Foundation The embedded foundation provides a strong base to support the entire crane structure. It ensures stability and prevents the crane from tipping or shifting under heavy loads. A well-constructed foundation is key to the crane’s safe operation and longevity.
Components of the Embedded Foundation The embedded foundation consists of several key parts:
- Concrete foundation: The solid base that supports the crane.
- Anchor bolts: Fixed to the foundation to secure the crane’s pillar.
- Leveling board: Ensures the crane is set at the correct height and alignment.
- Wiring tube: A channel for power cables to run safely.

Site Preparation
Assessing the Installation Site Before beginning construction, it’s crucial to assess the site. Check for:
- A flat, level area free of obstructions.
- Soil stability and load-bearing capacity.
- Access to power sources for crane operation.
Necessary Tools and Equipment for Excavation To dig the foundation hole and prepare the site, you’ll need:
- Excavators or shovels for digging.
- Measuring tools for precise dimensions.
- Concrete mixers for mixing the foundation material.
Excavating the Foundation Hole
Dimensions and Depth Specifications The foundation hole must meet specific size and depth requirements based on the crane's design and load capacity. Generally, the hole should be:
- Deep enough to accommodate the foundation and anchor bolts.
- Wide enough to ensure the crane is stable and securely mounted.
Proper Excavation Techniques When excavating, follow these steps:
- Dig carefully to maintain the correct depth and width.
- Avoid uneven or sloped surfaces in the foundation hole.
- Ensure there is no loose or soft soil that could affect the foundation's strength.
Assembling Foundation Components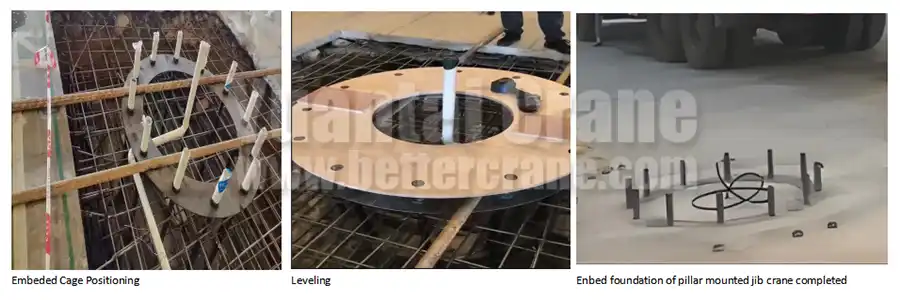
Installing Anchor Bolts, Leveling Board, and Bottom Board Once the hole is ready, start assembling the foundation components:
- Anchor bolts: Place and secure these bolts in the correct position to hold the crane pillar.
- Leveling board: Install it to ensure the crane is positioned at the right height.
- Bottom board: Fix it securely to provide a stable base.
Proper Alignment and Adjustment Techniques Use precise measurements and tools, like levels and plumb lines, to ensure that all components are aligned properly. This is critical for the crane’s stability and functionality.
Embedding the Foundation
- Placing Anchor Bolt Cage and Foundation Parts Position the anchor bolt cage into the foundation hole. This cage holds the bolts in place, preventing them from shifting during concrete pouring. You may need to use support beams or angle irons to suspend the cage properly.
- Pouring Concrete (Types and Mixing) Once everything is positioned, pour the concrete into the foundation hole. Use the appropriate type of concrete (usually coarse concrete for the base) and ensure it is mixed thoroughly for strength. Pour the concrete until it is about 50mm below the leveling board.
- Embedding Wiring Tube Before pouring the final layer of concrete, place the wiring tube in the foundation. This tube should run from the base up to the crane pillar, allowing power cables to be installed later.
- Concrete Curing and Tamping Allow the concrete to cure for several days. Use tamping tools to compact the concrete and eliminate any air pockets, ensuring maximum strength. This step is critical for the long-term durability of the foundation.
Final Foundation Leveling and Securing
- Adjusting and Tightening the Leveling Board After the concrete has cured, adjust the leveling board using the anchor bolts. Tighten them to make sure the foundation is perfectly level, ensuring the crane will sit at the correct height and be stable during operation.
- Cementing and Securing Foundation Components Once everything is in place, fill in any gaps around the foundation with fine concrete. Allow this layer to set before moving on to the crane assembly. Ensure that all components are secure and properly aligned.
Assembly of Pillar Jib Crane

Preparation for Crane Assembly
Necessary Tools and Equipment for Assembly Before starting the assembly process, gather all the necessary tools and equipment:
- Crane assembly tools: Wrenches, bolts, and nuts for securing components.
- Lifting equipment: Cranes or hoists for lifting heavy parts.
- Measuring tools: Levels and plumb lines to ensure proper alignment.
- Safety gear: Hard hats, gloves, and safety shoes for protection during assembly.
Checking Foundation Integrity Before Assembly Before proceeding with crane assembly, make sure the foundation is solid and properly cured. Verify the following:
- Anchor bolts: Ensure they are securely placed and at the correct height.
- Leveling board: Double-check that it is firmly fixed and level.
- Concrete curing: Confirm that the concrete has fully cured and is free from cracks or weak spots.
Pillar or Column Installation
Attaching Top Slewing Bearing Flange Start by securing the top slewing bearing flange to the top of the pillar. This flange will connect to the cantilever arm and is essential for smooth rotation.
- Tighten bolts to secure the flange firmly to the pillar.
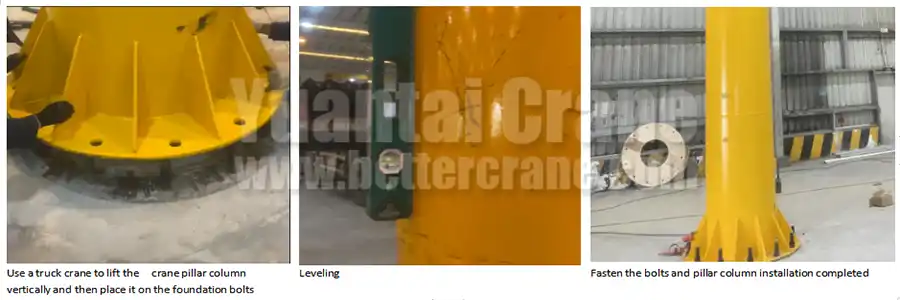
Positioning the Pillar on the Foundation Next, use a crane to lift the pillar vertically and position it on the foundation.
- Ensure the pillar’s base aligns with the anchor bolts.
- Check that the pillar is vertical and correctly positioned before continuing.
Leveling and Securing the Pillar Base Plate Once the pillar is in place, adjust its base plate so it is flush with the leveling board.
- Tighten the anchor bolts to secure the pillar firmly to the foundation.
- Double-check that the pillar remains vertical and level to prevent any operational issues.
Cantilever Installation
Lifting and Positioning the Cantilever Lift the cantilever arm using a crane and position it near the top of the pillar.
- Ensure that the cantilever is stable and properly supported during the installation process.
Attaching the Cantilever to the Slewing Bearing Flange Align the cantilever’s flange with the slewing bearing flange at the top of the pillar.
- Use bolts to securely attach the cantilever to the flange, ensuring that it is properly fixed and won’t shift during operation.
Ensuring Proper Alignment of the Cantilever After securing the cantilever, check its alignment with the pillar. It should be positioned horizontally and rotate smoothly.
- Use levels and measuring tools to verify proper alignment.
Electric Hoist Installation
Mounting the Electric Hoist on the Cantilever Lift and install the electric hoist onto the cantilever arm.
- Make sure the hoist is mounted securely and in the correct position for efficient load lifting.
Connecting Power Supply Lines Run the power supply lines through the foundation wiring tube and into the crane’s pillar.
- Ensure that the power lines are connected to the hoist and are routed safely.
Ensuring Secure Wiring Connections Double-check all wiring connections to ensure they are secure and insulated.
- Inspect the connections for any signs of wear or damage that could cause electrical issues.
With these steps, you will have successfully assembled the pillar jib crane, ensuring that all components are securely in place and properly aligned for safe operation.
Commissioning of Pillar Jib Crane
Pre-Commissioning Checklist
Inspecting All Components
Before starting the crane, it’s important to inspect each part of the installation thoroughly:
- Check that the pillar, cantilever, and hoist are securely mounted.
- Ensure all bolts are tightened and there are no loose or unaligned components.
- Inspect the electrical connections for proper insulation and safety.
Verifying Power Supply and Control Systems
Make sure the crane’s power supply is correctly connected and functioning:
- Confirm the power lines are properly connected to the hoist and crane.
- Test the control system to verify it operates smoothly without interruptions.
- Look for any wiring issues or power interruptions that could affect crane operation.
Testing the Crane Mechanism
Checking Hoist Functionality
Test the hoist to ensure it is functioning correctly:
- Gradually raise and lower a test load to verify smooth operation.
- Ensure the hoist operates without unusual sounds or jerks.
- Confirm that the hoist motor operates within the specified range and lifts the expected load capacity.
Testing Slewing and Lifting Movements
Check the slewing and lifting functions of the crane:
- Test the slewing mechanism by rotating the cantilever arm to ensure smooth and consistent rotation.
- Test the lifting function to confirm the crane moves loads smoothly in both horizontal and vertical directions.
- Ensure the crane can handle the full range of movement without stalling or resistance.
Ensuring Stability and Load Handling Capacity
Test the crane’s stability under load:
- Gradually load the crane up to its rated capacity and observe its behavior.
- Ensure that the crane handles the maximum load without swaying, tipping, or showing instability.
Adjustment and Calibration
Fine-tuning Hoist and Slewing Mechanisms
Make necessary adjustments to optimize the crane’s operation:
- Fine-tune the hoist mechanism to ensure it lifts loads smoothly and consistently.
- Adjust the slewing mechanism to ensure the cantilever arm rotates without resistance or jerks.
Checking Load Balance and Precision
Verify that the crane maintains balance during operation:
- Check that the crane remains stable while lifting and placing loads, especially at full capacity.
- Test the crane’s precision in lifting and placing loads at specific points without misalignment or swaying.
Final Safety Inspections
Verifying Safety Features and Locking Mechanisms
Perform safety checks on all critical features:
- Ensure the locking mechanisms are functioning properly to secure the crane when not in use.
- Test safety features like overload protection, limit switches, and emergency stop buttons to make sure they work as intended.
Ensuring Compliance with Safety Regulations
Verify that the crane meets safety standards and regulations:
- Check that the crane complies with local safety laws, including load limits and safety systems.
- Ensure that all required safety features are installed and functional.
Operational Training
Operator Training on Crane Usage
Train the operators to ensure they can use the crane safely and effectively:
- Provide detailed instructions on how to operate the hoist, slewing mechanisms, and safety features.
- Demonstrate the proper techniques for lifting, moving, and placing loads.
Safety Protocols and Maintenance Tips
Instruct operators on safety and maintenance:
- Teach operators about essential safety protocols, such as wearing protective gear and following lifting guidelines.
- Provide maintenance tips, including regular inspections, lubrication, and checking for wear to keep the crane in good condition.
Conclusion
Summary of Installation Process
The installation of a pillar jib crane is a detailed process that requires careful planning and execution. It involves constructing a solid foundation, assembling the crane components, and commissioning the system to ensure proper functionality. From preparing the site and digging the foundation to mounting the hoist and testing the crane’s movements, every step must be followed precisely to guarantee safe and efficient operation.
Importance of Regular Maintenance and Inspections
Regular maintenance and inspections are essential to keep the pillar jib crane in optimal condition:
- Routine checks ensure that all components, such as the hoist, slewing mechanism, and electrical systems, are functioning properly.
- Lubrication and cleaning are important to reduce wear and extend the lifespan of the crane.
- Inspection of safety features like overload protection and emergency stop functions is critical to avoid accidents.
By staying proactive with maintenance, you can minimize downtime and prevent costly repairs.
Final Recommendations for Crane Operation
To ensure the safe and efficient operation of your pillar jib crane:
- Train operators thoroughly on crane usage, safety protocols, and emergency procedures.
- Follow safety guidelines at all times, including using appropriate personal protective equipment (PPE).
- Monitor crane performance regularly to detect and address any issues early.
- Adhere to load limits and avoid overloading the crane to maintain stability and prevent mechanical failure.
By following these best practices, you can maximize the lifespan and performance of your pillar jib crane while ensuring the safety of all personnel involved.
Note: This guide is for reference only. For your specific application, please consult your pillar jib crane supplier for detailed recommendations and guidelines tailored to your crane model.