When to Cut and Connect Crane Girders: Practical Guide
When to Cut and Connect Crane Girders: Practical Guide
Learn when to cut and how to connect crane girders for 15-ton overhead cranes with practical steps and real workshop examples. overhead crane for sale !
When to Cut and How to Connect Crane Girders: A Case on 15t Overhead Cranes
Introduction
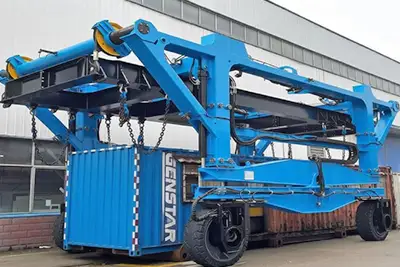
Dealing with crane girders longer than 12 meters is always a challenge. For a 15-ton overhead crane spanning over 13 meters, transporting one big, heavy beam from factory to site can be a major logistical headache. Roads, containers, and installation sites often limit what you can do.That’s why cutting the main girder into two manageable sections and reconnecting them on-site is a common and practical solution. This guide walks you through when it makes sense to cut girders and exactly how to connect them back together safely and reliably, focusing on a real case example: a 13,132 mm span girder split into 7,908 mm and 5,292 mm sections.

When to Cut Crane Girders
Cutting girders into sections isn’t just about convenience—it’s often necessary. Let’s break down the key reasons:
Transportation Constraints
Transporting a single girder over 13 meters long faces many challenges. Standard road vehicles and shipping containers usually max out at about 12 meters. Trying to ship longer beams means:
- Special permits and escorts: Oversized loads require permits, route approvals, and sometimes police escorts, all adding to cost and delay.
- Limited travel windows: Many countries restrict when oversized loads can travel, sometimes only at night or off-peak hours.
- Risk of damage: Longer beams flex during transport, risking cracks or permanent deformation if not properly supported.
By splitting girders, each piece fits standard trucks or containers, avoiding the hassle and risks above.
Site Access Limitations
Once your beam arrives, it needs to fit into the building or workspace. Many plants have:
- Narrow doors or gates that can’t accommodate full-length girders
- Low overhead clearance that limits lifting large beams into place
- Tight corridors or obstacles making it difficult to move large items
Shorter girder sections are easier to handle with smaller equipment and fewer people, reducing risk of damage or injury during installation.
. Span Length Considerations
For spans longer than 12 meters—like our 15-ton crane’s 13,132 mm beam—it’s standard practice to split girders. This example uses two sections: 7,908 mm and 5,292 mm. Doing so:
- Simplifies manufacturing and quality control at the factory
- Makes shipping and handling manageable
- Ensures proper fit and structural integrity when reconnected
This balance between length and handling makes it easier to meet project schedules and budget.
Manufacturing and Logistics
Modern manufacturers prefer modular girder production. They fabricate and machine each section with precise connection ends ready for assembly.
- Factory machining guarantees bolt holes line up perfectly
- Pre-fabricated splice plates reduce on-site work
- Modular production speeds delivery and installation
Modular girders also allow customization for different projects while keeping quality consistent.
How to Connect Crane Girders
Cutting the girder is only half the job. The connection method must be solid and reliable to maintain strength and safety.
Overview of Connection Methods
Two main methods exist for joining girder sections: field welding and mechanical connections. Field welding on site risks:
- Distortion due to heat
- Residual stresses weakening the joint
- Delays due to welding quality checks and rework
Mechanical connections, especially bolted splice joints, avoid these issues.
 overhead crane girder connection
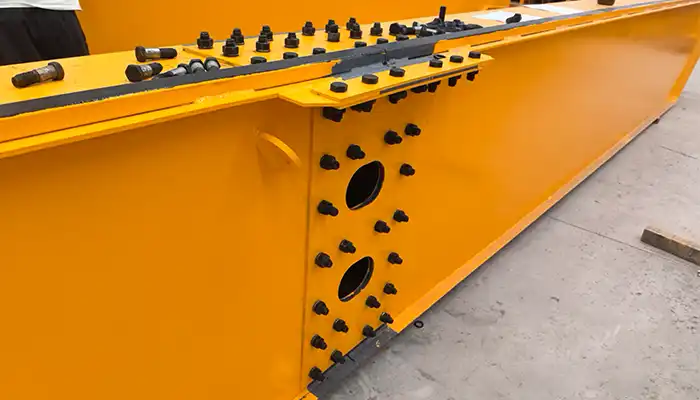
Sandwich Plate Connection Method
This is the most common method for 15-ton cranes. The ends of both girder sections are clamped between two thick, pre-drilled steel plates—one above the girder flange and one below—bolted together tightly.
- The girder web sits between the plates
- High-strength bolts go through plates and girder ends
- Plates are manufactured to fit perfectly around the girder flanges
This method distributes loads evenly and keeps the joint stiff and secure.
Engineering Design Considerations
- The connection must withstand bending moments, shear forces, and axial loads expected in crane operation.
- Use Grade 10.9 or higher high-strength bolts, tightened to the manufacturer’s torque specs.
- Maintain a maximum 0.5 mm gap between splice plates and girder flanges to ensure full contact and load transfer.
- Avoid any welding at the joint on-site to prevent distortion and preserve structural integrity.
Step-by-Step Assembly Process
Proper assembly on site is crucial for the joint’s success
- Place the 7,908 mm and 5,292 mm girder sections on flat, stable supports or alignment jigs.
- Clean all mating surfaces to remove dirt, grease, and rust.
- Inspect bolt holes for cleanliness and correct diameter; ensure no deformation or burrs.
- Verify rough alignment—ends should be close and roughly flush.
- Slide the top and bottom splice plates over the girder flanges, “sandwiching” the beam ends.
- Check all bolt holes align perfectly between plates and girder ends.
- Make sure plates sit flush against the flanges without gaps.
- If needed, use gentle tapping or hydraulic tools to adjust position.
- Insert high-strength bolts (typically M24 or M30) through the holes.
- Hand-tighten all bolts initially to keep parts in place but allow minor adjustments.
- Tighten bolts in a cross pattern using a calibrated torque wrench to the specified torque.
- Apply torque gradually in multiple passes until final values are reached.
- Measure the girder’s straightness and camber at the joint.
- Check for any deflection beyond allowed limits (usually specified by the crane manufacturer).
- Make small adjustments if necessary, loosening bolts slightly, repositioning, and retightening.
- Double-check torque on all bolts.
- Inspect contact surfaces for any gaps, misalignment, or damage.
- Mark bolt heads with torque seal paint for future verification.
- Record inspection results and assembly notes for documentation.
Technical Notes and Best Practices
To keep the joint safe and effective, follow these technical guidelines:
- Use only Grade 10.9 or higher bolts for splice connections.
- Follow torque specs from trusted standards like ISO 16047 or CMAA guidelines.
- Maintain flatness tolerances—gaps must be 0.5 mm or less between plates and girder flanges.
- No welding on the splice joint in the field—welding must be completed at the factory.
- For outdoor cranes, consider galvanizing or coating splice plates and bolts to prevent corrosion.
- Perform load testing after assembly to verify structural integrity.
Common Applications of Split Girder Cranes
Splitting girders and reconnecting them with sandwich plates is a proven practice in many situations:
- Workshop retrofits and upgrades: Older plants with limited access points benefit from sectional girders.
- Exported cranes: Container shipping restrictions make splitting girders necessary.
- Modular crane kits: Factory-made girder sections allow quick, easy field assembly, saving installation time.
- Projects with tight schedules or space constraints: Sectional girders reduce delays and logistical headaches.
This approach saves money and time while maintaining safety and performance.
Conclusion
Splitting crane girders and reconnecting them on-site using the sandwich plate method is a practical, reliable solution for 15-ton overhead cranes with long spans. It solves transportation and installation challenges while maintaining strength and safety comparable to a single-piece girder.
With proper design, manufacturing, and careful assembly following technical standards, this method offers peace of mind and flexibility. If you’re planning a large-span 15-ton bridge crane, talk to your supplier early about split girder options—they could save you time, cost, and hassle.