Indoor Crane Installation Timeline: Purchase to Commissioning
Most Important Takeaway
Efficient planning and understanding of the indoor crane installation timeline—from purchase order to commissioning—are essential to minimize downtime, control costs, and ensure safe, reliable operation in workshops, warehouses, or manufacturing facilities.
Key Takeaways (Bullet Points)
- Proper crane selection and understanding of building requirements prevents costly rework.
- Lead time varies for standard vs. customized indoor cranes; planning is critical.
- Early engineering and design approval ensures compatibility with existing structures and power supply.
- Site preparation, including runway beams, foundations, and electrical systems, is crucial for smooth installation.
- Mechanical and electrical installation must follow best practices for safety and compliance.
- Commissioning, load testing, and operator training are vital steps before handing over the crane.
- A structured timeline reduces production downtime and improves ROI on your crane investment.
Introduction
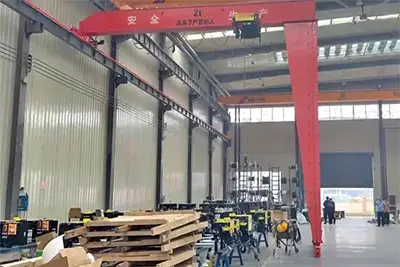
Indoor overhead cranes are essential for smooth and efficient material handling in workshops, warehouses, and factories. They help move heavy loads safely and reliably, whether it’s steel plates, machinery, or finished goods. But installing an indoor crane isn’t just about ordering equipment and hanging it up. Understanding the full installation timeline—from the purchase order to commissioning—helps buyers and plant managers avoid production delays, unexpected costs, and safety risks.
When you know what to expect at each stage, you can plan better, coordinate with suppliers, and make sure your facility is ready. This guide covers every step, including planning, design, delivery, installation, testing, and commissioning.
Stage 1: Purchase Order & Planning
The first stage sets the tone for the entire crane project. Proper planning now can save a lot of time and money later.
Before you even talk to suppliers, get very clear on what you need from the crane. Think about:
- Lifting capacity: What is the heaviest load the crane will handle regularly? Include occasional overloads.
- Span and headroom: Measure the distance between runway beams and the available height in the workshop. Make sure the crane fits without interfering with other equipment.
- Duty cycle: How often will the crane run each day? Light-duty cranes for occasional lifting have different requirements than a crane that runs continuously.
- Workflow considerations: Look at how materials move through your workshop. Will the crane improve efficiency? Are there obstacles like pillars, machines, or mezzanines?
Being specific here helps prevent buying a crane that's too small, too short, or just not suited to your operations.
Once requirements are clear, it's time to find the right supplier. Don't just pick the first option—compare multiple manufacturers, especially if you are considering Chinese and international suppliers. Important points to check:
- Certifications: Ensure the supplier has CE, ISO, or other relevant safety and quality certifications.
- Experience: Ask for references or case studies, particularly from buyers with similar applications.
- Crane types offered: Make sure the supplier can provide single girder cranes, double girder cranes, or customized indoor cranes based on your needs.
- After-sales support: Installation support, spare parts availability, and maintenance services are just as important as the crane itself.
Request detailed quotations including technical drawings, lead times, and shipping terms. Don't hesitate to ask questions—clarity now prevents misunderstandings later.
Timing is everything. A crane project can take weeks or months depending on what you order. Here's what to consider:
- Standard cranes: Usually faster to produce, often within a few weeks. Ideal for common lifting requirements.
- Customized cranes: Require extra engineering and manufacturing time. If your application is unusual, factor in at least 6–8 weeks for production.
- Shipping and logistics: Include transport from the factory to your site, customs clearance if imported, and any special handling for oversized components.
Planning the lead time realistically ensures your installation aligns with production schedules. It also prevents last-minute scrambling or idle equipment in your workshop.
Stage 2: Engineering & Design
Once the purchase order is confirmed, the next step is engineering and design. This stage ensures the crane will fit your facility, meet your lifting needs, and operate safely. Skipping or rushing this step is one of the most common reasons indoor crane projects face delays or extra costs.
Before manufacturing starts, review every technical detail carefully. This includes:
- Structural drawings: Check the girder design, runway alignment, and support structures. Ensure the crane can handle the expected loads without overstressing the building or crane components.
- Hoist specifications: Confirm lifting capacity, speed, and duty cycle match your operational needs. Make sure the hoist type (wire rope or chain) suits your materials and workflow.
- Electrical schematics: Verify power requirements, control panel layout, and compatibility with your facility's electrical system.
It's also critical to confirm that the crane design aligns with your building structure, headroom, and workshop layout. Misalignment at this stage can result in costly rework or delays later.
Many workshops require cranes that go beyond standard designs. Ask your supplier about practical customizations:
- Protective covers: Useful in dusty, humid, or chemical environments to protect the hoist and trolley.
- Anti-corrosion coating: Important for workshops handling metals, chemicals, or outdoor-adjacent indoor environments.
- Explosion-proof hoists: Needed in environments with flammable gases or dust.
- Other adjustments: Adjustable end trucks, variable speed trolleys, or special hook configurations for your specific material handling tasks.
Customizations may add a little extra lead time, but they significantly improve crane lifespan and reduce maintenance needs.
Engineering is not just about drawings—it's also about how the crane will be installed on-site. This stage includes:
- Installation method: Determine whether you'll use cranes, lifts, or temporary supports for assembly.
- Required tools and equipment: Ensure your crew has all tools, hoists, and safety equipment needed for installation.
- Crew size and skills: Decide if you need specialized engineers from the supplier or if your in-house team can handle assembly.
- Minimizing disruption: Schedule installation during low-production periods to avoid halting workflow. Plan for moving equipment or temporarily relocating work areas if necessary.
Pre-installation planning avoids surprises during assembly and ensures the project stays on schedule.
Stage 3: Manufacturing & Quality Control
Once the design is approved, the crane moves into manufacturing. This is where all the planning and engineering decisions come to life. A solid manufacturing process, combined with thorough quality control, ensures your indoor crane will perform reliably for years.
The crane components are built according to the approved drawings and specifications. Key fabrication steps include:
- Girders: These are the main beams that carry the hoist and trolley. They must meet strict standards for strength and rigidity.
- Runway beams: These support the crane's movement across the workshop. Precision is critical for smooth operation.
- End trucks and trolleys: Ensure proper wheel alignment and compatibility with the hoist.
- Hoists: Manufactured or assembled according to lifting capacity, duty cycle, and environmental requirements.
- Auxiliary components: Includes electrical panels, limit switches, hook blocks, and protective covers.
A well-organized fabrication process minimizes errors and ensures that components fit together perfectly during installation.
Quality control cannot be rushed. Even a small flaw in the structure or hoist can cause serious safety issues later. Key quality steps include:
- Factory load tests: Each crane or hoist is tested under controlled loads to verify performance.
- Certifications: CE, ISO, and other relevant certifications are checked for compliance with international standards.
- Third-party inspections: Independent inspections provide extra assurance that materials, welding, and assembly meet the required safety and reliability standards.
These checks protect your investment and prevent problems after installation.
After passing quality checks, the crane components are prepared for delivery to your site. Important steps include:
- Secure packaging: Protects girders, hoists, and delicate electrical components from damage during transport.
- Transportation planning: Oversized or heavy components may require special vehicles or handling equipment.
- Customs clearance: If the crane is imported, all documentation must be ready for smooth import and delivery.
Proper shipment preparation ensures your crane arrives on time and in perfect condition, ready for installation.
Stage 4: Delivery & Site Preparation
After manufacturing and quality checks are complete, the crane components are ready to be shipped to your facility. This stage is critical because even the best crane can run into issues if the site isn't prepared properly. Proper delivery management and site readiness make the installation process smoother and safer.
When the crane arrives at your facility, don't just sign for it and move on. Take the time to:
- Inspect for damages: Check girders, hoists, trolleys, and electrical components for any signs of shipping damage.
- Verify inventory: Make sure every component listed in the packing list has arrived, including fasteners, limit switches, and protective covers.
- Document issues immediately: Any missing or damaged parts should be reported to the supplier right away to avoid installation delays.
A careful check at this stage prevents surprises during assembly and keeps the project on schedule.
Before installation can start, the site itself must be ready. Key points include:
- Foundations and runway beams: Ensure foundations are level, strong, and free of debris. Runway beams should be properly aligned and secure.
- Structural support: Verify that columns, walls, or other building structures can support the crane load safely.
- Electrical system: Check voltage, phase, grounding, and capacity. Make sure your facility can handle the crane's power requirements.
A well-prepared site reduces downtime and prevents costly rework during installation.
Safety is non-negotiable when handling heavy equipment. Before installation:
- Mark the installation area: Restrict access to prevent accidents.
- Ensure safety equipment is available: Helmets, harnesses, lifting gear, and fire extinguishers should be on hand.
- Secure necessary permits: Make sure any local or workplace permits for crane installation are approved.
Prioritizing safety at this stage protects workers and ensures compliance with regulations.
Stage 5: Installation
This is the stage where your indoor crane finally comes together on-site. Proper installation is crucial—any misalignment or loose connection can lead to operational problems, downtime, or safety hazards. Following a structured approach ensures everything works as planned.
Mechanical assembly is the backbone of the crane setup. During this step:
- Assemble girders, trolleys, hoists, and end trucks: Start with the main girders, then attach end trucks and trolley systems. Make sure the hoist is positioned correctly for optimal lifting.
- Align runway beams with precise tolerances: Even a small misalignment can cause uneven wear or prevent smooth crane movement. Use leveling tools and measuring devices to verify positioning.
- Check connections and fasteners: Ensure all bolts, welds, and joints meet design specifications. Loose connections can compromise safety and crane lifespan.
Proper mechanical installation lays the foundation for smooth operation and minimizes maintenance issues later.
After the mechanical components are in place, the electrical system is set up:
- Connect power supply, control panels, and limit switches: Make sure voltage, phase, and grounding match the crane's requirements.
- Integrate with existing plant systems if needed: Some workshops may link the crane to automation or production line controls. Verify compatibility before powering on.
- Test control functions: Check direction controls, emergency stop switches, and any programmable features to ensure full operational readiness.
Accurate electrical installation prevents future downtime and enhances operator safety.
Before moving to full operation, the crane must undergo initial testing:
- No-load and light-load tests: Run the crane without lifting anything heavy to ensure smooth motion, proper alignment, and correct speed.
- Check travel, lifting, braking, and safety functions: Verify hoist movement, trolley travel, end stop functionality, and emergency braking.
- Inspect for unusual noises or vibrations: Address any issues immediately to avoid long-term damage.
These initial tests confirm that the crane operates safely and efficiently before handling full loads.
Stage 6: Commissioning & Handover
Commissioning is the final step where the crane moves from being a set of components to a fully operational system. This stage ensures the crane works as intended, operators are trained, and all documentation is in place. Skipping or rushing commissioning can lead to safety risks and operational problems down the line.
Before putting the crane into regular service, full-load testing is essential:
- Verify lifting capacity: Use the crane's maximum rated load to ensure the hoist and structure can safely handle the weight.
- Check speed and travel: Confirm that the hoist lifts smoothly at the correct speed and that trolley and bridge movements are precise.
- Test braking systems: Emergency and service brakes must respond correctly under full-load conditions.
- Observe for issues: Watch for unusual vibrations, noises, or misalignment. Any problems must be corrected before handover.
Load testing ensures the crane is safe, reliable, and ready for daily operations.
Even the best crane won't function safely without trained operators. Training should cover:
- Safe operation practices: How to lift, travel, and position loads without risking damage or injury.
- Inspection routines: Daily and weekly checks to detect wear, misalignment, or electrical issues early.
- Maintenance guidance: Lubrication schedules, part replacements, and how to report faults.
Well-trained operators reduce accidents, downtime, and long-term maintenance costs.
A proper handover includes all necessary documents:
- Operation manuals: Step-by-step guidance on safe crane operation.
- Maintenance logs: Record of inspections, adjustments, and repairs during installation.
- Warranty documentation: Covers crane components and service commitments from the supplier.
Having organized documentation ensures compliance with safety standards and makes future maintenance straightforward.
The commissioning phase concludes with the buyer's inspection:
- Walkthrough inspection: Verify that the crane matches specifications, is properly installed, and passes all tests.
- Official commissioning: Sign-off confirms the crane is ready for full operational use.
Final acceptance marks the successful transition from installation to productive use, giving the facility a fully functional indoor crane.
Stage 7: Post-Installation Support
Even after commissioning, your work isn't done. Post-installation support ensures your indoor crane continues to operate safely, efficiently, and reliably over its lifespan. Proper maintenance and timely troubleshooting can prevent costly downtime and extend the crane's service life.
Regular inspections are key to avoiding unexpected breakdowns. Focus on:
- Daily checks: Inspect hooks, ropes or chains, limit switches, and general wear and tear.
- Weekly or monthly inspections: Check lubrication points, electrical connections, and wheel alignment.
- Preventive maintenance: Replace worn components before failure occurs, tighten loose bolts, and keep hoists and trolleys clean.
Following a structured maintenance schedule keeps the crane in peak condition and ensures compliance with safety regulations.
Even with proper maintenance, issues can arise. Ensure your supplier provides:
- On-site support: Engineers or technicians available for urgent troubleshooting or repairs.
- Remote support: Guidance via phone, video call, or online manuals for quick problem resolution.
- Spare parts availability: Keep critical components on hand to minimize downtime.
Reliable support ensures small problems don't turn into production-halting issues.
Small, practical steps can significantly extend the life of your crane and lower running costs:
- Follow operational limits: Avoid lifting beyond the rated capacity.
- Keep the crane clean and lubricated: Dust, debris, and corrosion can damage mechanical and electrical components.
- Train operators consistently: Proper handling reduces wear and tear.
- Document all maintenance: A detailed log helps identify recurring issues and plan upgrades proactively.
Typical Timeline Summary
Understanding the expected duration for each stage of an indoor crane project helps buyers and workshop managers plan resources, coordinate teams, and avoid unnecessary downtime. While actual timelines may vary depending on crane type, customization, or shipping conditions, the table below provides a realistic overview for a standard indoor crane installation.
Installation Timeline by Stage
| Stage | Typical Duration |
|---|---|
| Purchase Order & Planning | 2–4 weeks |
| Engineering & Design | 2–3 weeks |
| Manufacturing & Quality Control | 4–8 weeks |
| Delivery & Site Preparation | 1–2 weeks |
| Installation | 1–2 weeks |
| Commissioning & Handover | 1 week |
Practical Notes on Timeline
- Standard vs. customized cranes: Standard single girder cranes usually follow the shorter end of these durations, while customized double girder or heavy-duty cranes may require extra time for design, production, and testing.
- Shipping and logistics: Factor in additional days if components are imported, oversized, or need special handling.
- Overlap opportunities: Some stages, like site preparation, can begin while manufacturing is still ongoing to save time.
- Contingency planning: Always leave a buffer of 1–2 weeks for unforeseen delays such as supplier issues, local inspections, or site adjustments.
By mapping the project against this timeline, buyers can coordinate installation teams, schedule production shifts, and ensure a smooth workflow from the first purchase order to commissioning.
FAQs: Questions This Article Solves
This guide helps crane buyers, workshop managers, and facility planners understand the full indoor crane installation timeline, from purchase order to commissioning. Here are the key questions answered:
The total timeline typically ranges from 10 to 20 weeks, depending on crane type, customization, manufacturing lead times, and shipping. Standard single girder cranes are faster to deliver, while customized double girder or heavy-duty cranes may take longer.
Careful planning and proactive coordination are essential. Key steps include:
- Confirm crane specifications and site requirements before ordering.
- Approve engineering drawings and designs promptly.
- Prepare the site in parallel with manufacturing.
- Coordinate delivery schedules and crew availability.
Facility readiness is critical:
- Check foundation strength, runway beams, and structural support.
- Verify electrical capacity, voltage, phase, and grounding.
- Ensure proper headroom and workspace clearance for crane movement.
- Standard cranes: Usually 2–4 weeks for planning and 4–6 weeks for manufacturing.
- Customized cranes: Can take 6–8 weeks or more due to special engineering, protective features, or heavy-duty components.
Key checks include:
- Factory load tests and third-party inspections.
- On-site mechanical alignment of girders, trolleys, and hoists.
- Electrical verification: control panels, limit switches, and grounding.
- Initial testing: no-load, light-load, and full-load trials to confirm performance and braking.
Effective site preparation reduces downtime:
- Inspect and level foundations and runway beams.
- Clear the installation area and restrict access for safety.
- Have all tools, lifting equipment, and crew ready.
- Plan installation timing to minimize disruption to ongoing operations.
Conclusion
Installing an indoor crane is more than just getting the equipment on-site—it’s about planning, coordination, and attention to detail at every stage. A successful installation depends on:
- Careful planning: Clearly define lifting capacity, crane type, and site requirements before ordering.
- Communication with suppliers: Stay in close contact during design, manufacturing, and delivery to prevent misunderstandings.
- Thorough site preparation: Make sure foundations, runway beams, and electrical systems are ready for smooth assembly.
- Structured timeline adherence: Following the timeline from purchase order to commissioning helps minimize downtime and avoids unexpected costs.