Fixed-Height Aluminum Gantry Cranes: Installation to Inspection
Fixed-Height Aluminum Gantry Cranes Manual. Comprehensive guide for setup, operation, inspection, and maintenance of aluminum gantry cranes.
Introduction
This manual serves as a comprehensive guide for understanding, installing, and safely operating your fixed-height aluminum gantry crane. Whether you're new to cranes or have prior experience, this manual will help you at every step—from assembly to daily operation and regular maintenance.
Here’s what you can expect:
- Step-by-step setup and installation instructions
- Safety tips to ensure safe operation
- Maintenance and inspection guidelines to keep your crane in optimal condition
- Troubleshooting advice for common issues
The goal is simple: to help your crane perform efficiently, stay safe, and last as long as possible.
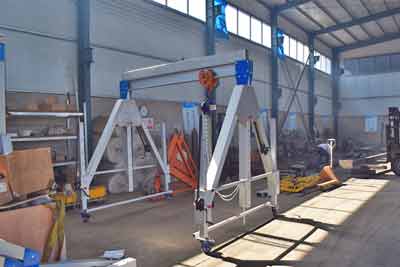
What Is a Fixed-Height Aluminum Gantry Crane?
A fixed-height aluminum gantry crane is a versatile lifting system made from lightweight yet durable aluminum. These cranes are portable and are designed for specific tasks where overhead lifting is needed but a permanent crane installation isn’t an option.
Key features include:
- Fixed height: The crane does not adjust up or down
- Lightweight aluminum frame: Makes the crane easy to transport
- Portable: Can be moved easily from one location to another
- Corrosion-resistant: Suitable for both indoor and outdoor environments
The basic components are:
- Two upright side frames
- A horizontal I-beam across the top for lifting
- Casters at the base for mobility
- A hoist and trolley system for lifting and moving loads
Thanks to the corrosion resistance of aluminum, these cranes are perfect for environments where rust could be an issue, like outdoor spaces or humid areas.
Typical Use Cases
Fixed-height aluminum gantry cranes are used in many industries.
They’re a solid choice when you need to lift things but also need to move the crane around.
Here are some common applications:
- Maintenance work: Removing engines, pumps, or heavy parts
- Manufacturing: Moving raw materials or tools
- Material handling: Loading or unloading goods in small warehouses
- Workshops and garages: Mobile lifting for repairs or setups
- Construction sites: Where quick setup and takedown matter
Their portability makes them a handy tool wherever flexibility is key.
Applicable Safety and Compliance Standards
Safety matters. These cranes must meet key standards to ensure safe use.
The following rules and guidelines apply:
- OSHA (Occupational Safety and Health Administration): Sets workplace safety standards in the U.S.
- ASME B30.17: Covers overhead and gantry cranes
- ANSI (American National Standards Institute): Provides safety labeling and engineering guidelines
Make sure your team knows these rules. They help reduce risks and keep operations running smoothly.
Aluminum Gantry Crane System Overview
Key Features and Benefits
Fixed-height aluminum gantry cranes offer a good mix of strength, portability, and ease of use.
They’re designed for people who need to lift and move loads safely—but also need the crane to be mobile and easy to handle.
Here’s what makes these cranes stand out:
- Lightweight aluminum structure: Easy to move by hand, even without a forklift.
- Fixed height: Simple design with no telescoping parts—stronger and more stable.
- Rust-resistant: Good for indoor or outdoor use, even in damp or coastal areas.
- No permanent installation needed: Roll it into place when needed, then store it away.
- Quick assembly: Fewer parts, straightforward setup—no special tools required.
- Custom options: Beam lengths, caster types, or hoist styles can be tailored to your job.
Bottom line: it’s a solid, all-purpose lifting tool when you want mobility without losing strength.

Technical Specifications
Standard Dimensions and Load Capacities
Fixed-height aluminum gantry cranes come in a range of sizes to match different job needs.
You’ll usually find the following specs:
- Lifting capacity: Common models lift 500 kg, 1 ton, 2 tons, 3 tons, or 5 tons.
- Span (beam length): Usually between 2 meters (6.5 ft) to 6 meters (20 ft).
- Height under beam: Fixed heights are typically between 2.5 to 4 meters (8 to 13 ft).
- Overall width: Slightly wider than the beam span, depending on caster type and base frame.
Always check the load rating on the nameplate. The capacity is based on even weight distribution and proper use.
Never overload. It's unsafe and may damage the crane.
| Item No. | Rated Load (ton) |
Total Height (mm) |
Max. Lifting Height (mm) |
Outside Span (mm) |
Inner Span (mm) |
Height (mm) |
|---|---|---|---|---|---|---|
| LT-1 | 0.5 | 3000 | 2420 | 2000 | 1880 | 460 |
| 0.5 | 3000 | 2420 | 3000 | 2880 | 460 | |
| 0.5 | 4000 | 3420 | 3000 | 2880 | 460 | |
| 0.5 | 4000 | 3420 | 4000 | 3880 | 460 | |
| 1 | 3000 | 2470 | 2000 | 1880 | 410 | |
| 1 | 3000 | 2470 | 3000 | 2880 | 410 | |
| 1 | 4000 | 3470 | 3000 | 2880 | 410 | |
| 1 | 4000 | 3470 | 4000 | 3880 | 410 | |
| 2 | 3000 | 2215 | 2000 | 1800 | 535 | |
| 2 | 3000 | 2215 | 3000 | 2800 | 535 | |
| 2 | 4000 | 3215 | 3000 | 2800 | 535 | |
| 2 | 4000 | 3215 | 4000 | 3800 | 535 | |
| 3 | 3000 | 2122 | 2000 | 1800 | 685 | |
| 3 | 3000 | 2122 | 3000 | 2800 | 685 | |
| 3 | 4000 | 3122 | 3000 | 2800 | 685 | |
| 3 | 4000 | 3122 | 4000 | 3800 | 685 |
Typical Configurations and Customization Options
Most cranes follow a standard "A-frame" style with a straight I-beam on top.
But depending on your space or workflow, you can request:
- Different span lengths: For wide or narrow loads
- Custom I-beam profiles: For heavier or lighter-duty lifting
- Swivel or rigid casters: Based on how much steering control you need
- Fixed or adjustable tread width: Some base frames can be spread or narrowed
- Painted, anodized, or bare aluminum finishes: For different corrosion protection levels
- Leveling feet or floor locks: If you need the crane to stay firmly in place during lifting
Need a hoist included? That can be matched to your lifting needs too. Everything can be tailored.
Compatible Hoists and Accessories
A fixed-height aluminum gantry crane isn’t much help without a hoist.
Luckily, these cranes are compatible with a wide range of hoists, including:
- Manual chain hoists: Simple, affordable, and great for light use
- Lever hoists: Good for precise load positioning
- Electric wire rope hoists: For heavier lifting and higher frequency operations
- Electric chain hoists: Common and compact for many types of jobs
Other add-ons you might use:
- Trolleys: Manual or motorized, used to move the hoist along the beam
- End stops: Keep the trolley from rolling off the ends
- Tag lines: For guiding loads during movement
- Cable management systems: To keep hoist cables tidy and out of the way
Just make sure any hoist you attach matches the beam and load rating of the crane. The beam must be able to support both the weight of the load and the hoist itself.
Material Composition and Surface Treatments
These cranes are built from 6061-T6 or 6063-T6 aluminum alloy, known for being:
- Strong yet lightweight
- Corrosion-resistant
- Suitable for both indoor and outdoor jobs
Other parts include:
- Fasteners: Usually stainless steel or zinc-coated for rust resistance
- Casters: Steel or aluminum frames with polyurethane, rubber, or pneumatic wheels
Surface treatments vary by model:
- Anodized aluminum: Offers added corrosion resistance and a clean finish
- Powder coating (optional): Increases surface hardness and adds color
- Bare aluminum: For general-use models in non-corrosive environments
Design Limitations
While these cranes are tough, they do have limits.
- Fixed height: They don’t telescope or adjust up/down. You need to pick the right size before ordering.
- Not for overhead travel systems: These cranes don’t run on rails or tracks like bridge cranes.
- Wind exposure: Most models are not rated for use in strong outdoor winds. As a rule: avoid outdoor use when wind exceeds 20 km/h (12 mph).
- Lifting only vertical loads: No side-pulling or dragging loads—this can stress the frame and cause tipping.
If you need to work outdoors or in extreme conditions, tell your supplier. They may suggest upgrades or alternatives.
Environmental Tolerances
Aluminum gantry cranes are made to handle a range of working conditions—but not everything.
Temperature:
- Safe operating range is usually between -20°C to +45°C (-4°F to 113°F).
- At very low temps, metal can become brittle; at high temps, strength drops slightly.
Corrosion resistance:
- Aluminum handles moisture and chemicals better than steel.
- Best choice for humid, coastal, or lightly corrosive environments.
- Not suitable for strong acid or alkali exposure without extra treatment.
Cleanroom and food-grade use:
- Special finishes and sealed casters are available for labs or food facilities.
- Always confirm your environment with the supplier to avoid long-term wear or performance issues.
Component Identification
Understanding each part of your gantry crane helps with setup, operation, and maintenance. Here's a breakdown of the main components and what they do.
Structural Frame
The frame is what gives the crane its strength and shape. It’s made up of three key elements:
Uprights (legs)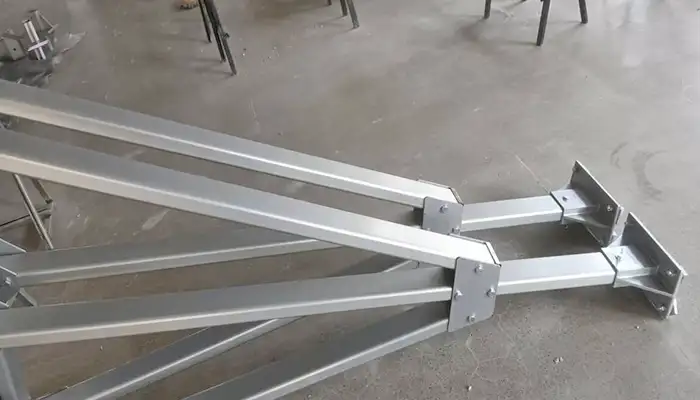
These vertical supports hold up the I-beam and connect to the base.
- Usually square or rectangular aluminum tubing
- Some have welded or bolted gussets for added strength
- May include mounting points for accessories or braces
Base supports (feet or legs)
These sit flat on the ground and hold the casters.
- Designed to spread load evenly and prevent tipping
- Often wider than the uprights for stability
- May include mounting holes or locking plates
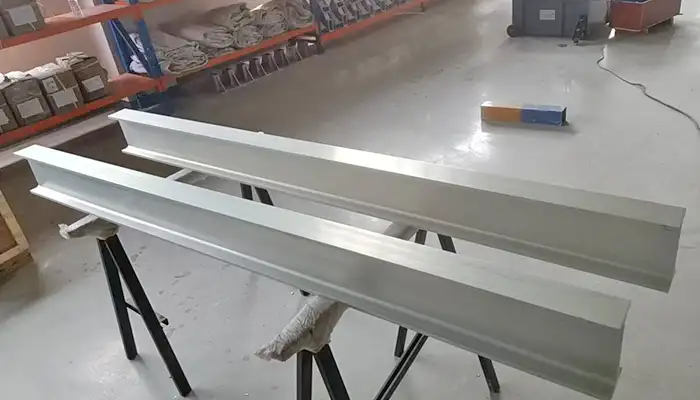
Cross-member (I-beam)
This is the horizontal beam that spans across the two uprights.
- Carries the hoist and the load
- Typically a wide-flange or standard I-beam made of aluminum
- Designed to support vertical loads only—not for pulling or side loading
Make sure all structural parts are free from cracks, bends, or corrosion before use.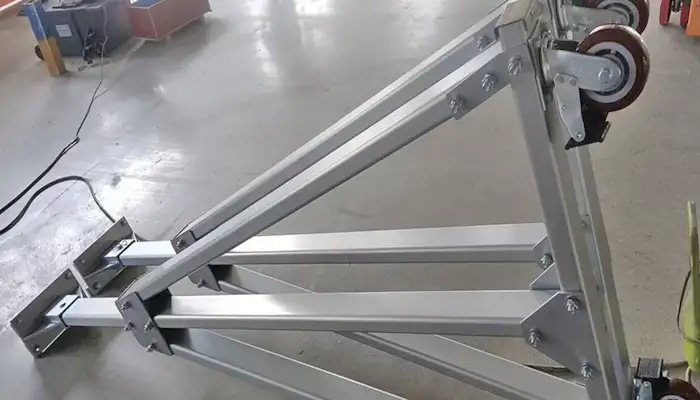
Mobility: Casters with Locking Brakes
Casters make the crane mobile. They’re mounted at the base of each leg.
Swivel casters
- Allow easy turning and movement in tight spaces
- Some models have 360° rotation for full steering
Locking brakes
- Each caster usually includes a foot-activated brake
- Locks both the wheel and the swivel head
- Always engage brakes before lifting a load
Some cranes may offer pneumatic tires for rougher outdoor surfaces, or polyurethane wheels for smooth indoor floors.
Lifting Mechanism
This is what does the actual lifting. It includes two parts:
Trolley
- Rolls along the bottom flange of the I-beam
- Supports the hoist and moves the load side-to-side
- Can be manual push-type or motor-driven
- Some models come with locking features to stop movement
Hoist
- Lifts and lowers the load
- Manual chain hoists are common for lighter work or where no power is available
- Electric hoists are faster and easier for frequent lifting
- Check that the hoist matches the crane’s capacity and beam size
Always attach the hoist securely to the trolley with proper rigging hardware.
Fasteners and Safety Hardware
These small parts hold the entire system together. Don’t overlook them.
Bolts and nuts
- Used in joints and mounting points
- Should be tightened to the torque specified in the manual
Locking pins
- Quick-connect parts used for securing uprights or hoist attachments
- Often include safety clips or retainers to prevent accidental removal
Washers and spacers
- Ensure proper fit and even load distribution
- Prevent metal-on-metal wear in joints
It’s a good idea to keep spare pins and bolts on hand in case any go missing during transport or use.
Optional Attachments
These extras improve crane safety and handling in certain environments.
End stops
- Prevent the trolley from rolling off the end of the beam
- Often simple bolt-on steel blocks or rubber bumpers
Leveling feet
- Used when floors are uneven
- Allow small height adjustments to keep the crane level
Tag lines
- Ropes or straps used to guide the load and prevent spinning or swinging
- Very helpful for long or awkward items
You may not need all these options, but they can improve safety and control.
Site Requirements and Preparation
Before setting up your fixed-height aluminum gantry crane, it's important to make sure the area is suitable. A proper site helps ensure safe use and long-term reliability. Here's what to check.
Floor Condition and Levelness
The crane must sit on a hard, flat surface. Uneven or soft floors increase the risk of tipping or misalignment.
- Concrete floors are ideal—smooth, level, and strong
- Avoid slopes, cracked surfaces, or loose materials like gravel or dirt
- Use a level to check if the ground is flat across the crane’s footprint
- If there’s any unevenness, consider adding leveling shims or feet (if equipped)
A solid base keeps the crane stable—especially when moving loads.

Space and Clearance Requirements
Make sure there’s enough room for safe operation, movement, and assembly.
- Around the crane: Leave at least 1 meter (3 feet) of open space on all sides
- Above the crane: Check for clearance between the top of the I-beam and ceiling, ducts, or lighting
- For the load: Make sure the space is wide and tall enough to move your materials easily
- Keep clear aisles or walkways for operator access
Tight spaces can cause accidents. Better to measure before you move in the crane.
Overhead and Lateral Obstruction Checks
Take a few minutes to scan the area for anything that could get in the way.
- Overhead obstacles: Look for lights, pipes, cables, or sprinkler systems
- Side obstructions: Avoid positioning too close to walls, shelves, or machines
- If you're using a trolley or hoist, make sure nothing will block its side-to-side travel
It's helpful to walk the path your load will follow—just like a rehearsal.
Environmental Considerations
Outdoor or rough environments may need extra care or equipment.
Wind exposure:
- Do not use the crane outdoors in wind speeds over 20 km/h (12 mph)
- Wind can tip or shift the crane, especially when it’s loaded
- Use wheel brakes or tie-downs if there’s a risk of sudden gusts
Corrosive environments:
- Aluminum resists rust, but exposure to salt spray, chemicals, or acids may still cause wear
- Consider using anodized parts or extra coatings for harsh conditions
- Clean and inspect regularly if the crane is used in chemical plants or coastal areas
Tell your supplier if you need a crane for outdoor or industrial use—they can recommend the right finish or upgrades.
Electrical Requirements for Powered Hoists
If your crane will use an electric hoist, check power availability before setup.
- Power supply type: Most hoists run on 220V single-phase or 380V three-phase (check your model)
- Outlet location: Keep the plug or connection point close to the hoist for safety
- Use heavy-duty extension cords rated for the hoist’s power draw—don’t use regular cords
- Ground the system properly and avoid areas with moisture or water exposure
If you're unsure, it's worth having an electrician verify the setup. Improper wiring can damage the hoist or cause accidents.
Assembly and Installation
This section walks you through how to safely assemble and install your gantry crane. Take your time and follow each step. If something doesn’t look or feel right, stop and check.
Required Tools and Safety Equipment
Before you begin, gather the tools and protective gear you'll need.
Tools:
- Adjustable wrenches or socket set
- Torque wrench (for final tightening)
- Allen keys (for some models)
- Rubber mallet (optional, for small adjustments)
- Measuring tape and level
- Ladder or step stool (for I-beam installation)
Safety equipment:
- Work gloves
- Safety glasses
- Steel-toe boots
- Hard hat (especially if assembling with a team)
Having everything ready saves time and helps you stay safe.
Step-by-Step Assembly Instructions
Let’s go through the build in the order that makes the most sense.
Frame Construction
Start by building the upright legs and base supports.
- Lay out all frame parts on the ground in your work area.
- Connect each upright to its base support using bolts and locking pins.
- Make sure the uprights are seated fully and square to the base.
- Hand-tighten bolts for now—you’ll torque them later.
Check that both legs are the same height and level. Uneven legs can cause beam misalignment.
I-Beam Mounting and Alignment
Now attach the horizontal I-beam to the top of the uprights.
- Use a helper or lifting aid—the I-beam is heavy and awkward.
- Raise one end of the beam and bolt it to the top plate or bracket of one upright.
- Do the same on the other side.
- Adjust so the I-beam is centered and level across its length.
- Confirm that the beam is not twisted or sloping to one side.
Use a level and measuring tape to double-check alignment before tightening.
Caster Installation
Casters are installed on the bottom of each base support to allow movement.
- Bolt or pin the casters into place. Most use four bolts per caster.
- Check rotation and brake function before use.
- Engage brakes before the crane is stood upright or loaded.
For some models, you may need to install casters before raising the frame. Always follow manufacturer instructions for your model.
Hoist and Trolley Setup
This part depends on your hoist type (manual or electric).
- Slide or clamp the trolley onto the bottom flange of the I-beam.
- Attach the hoist securely to the trolley using proper lifting hardware (like a clevis or shackle).
- Make sure the trolley rolls smoothly and sits level.
- If using an electric hoist, connect to power and do a test lift (without load) after final checks.
Double-check that the hoist matches the beam size and weight capacity.
Torque Specifications and Final Tightening
Once everything is aligned, go back and tighten all bolts to their proper torque settings.
- Refer to your crane’s manual for torque values (usually measured in Nm or ft-lbs).
- Use a torque wrench to apply the correct pressure to all structural fasteners.
- Don’t guess—overtightening can strip threads, and undertightening may lead to failure.
Final tightening is critical for long-term safety.
Initial Load Testing and Certification Steps
Before you put the crane into regular use, perform a load test to confirm it's safe.
- Most manufacturers recommend a test at 125% of rated capacity
- Slowly lift the load and hold it for a few minutes
- Watch for flexing, frame instability, or unusual noises
- If it passes, record the results in a load test log
- Some companies may require a certified inspector to sign off
Once tested, label the crane with its rated capacity and any safety signage.
Operating Instructions
This section covers the daily start-up routine, safe handling practices, and how to operate your gantry crane efficiently and safely. Proper operation is key to preventing accidents and prolonging the crane’s life.
Daily Start-up and Pre-use Inspection
Before each use, take a few minutes to inspect the crane. This ensures everything is in working order and helps avoid problems during operation.
- Visual check: Look for any damage, wear, or missing parts (e.g., bolts, pins).
- Frame check: Ensure uprights, base supports, and I-beam are secure and free from cracks or bends.
- Caster check: Verify that the casters rotate smoothly and that the brakes function correctly.
- Hoist check: Inspect the hoist, trolley, and lifting mechanism for smooth operation.
- Electrical check (if applicable): Confirm the hoist is connected properly and the power supply is stable.
- Lubrication: If necessary, lubricate the hoist chain or trolley rollers.
It’s important to perform this inspection every time before you start the crane. If you find something wrong, don’t use the crane until it’s fixed.
Safe Lifting and Load Handling Practices
Always follow these guidelines to ensure safe lifting and handling.
- Check the load: Verify the weight, size, and type of material to ensure it doesn’t exceed the crane’s rated capacity.
- Center the load: Always position the load evenly under the hoist. This prevents tipping or swinging.
- Use lifting straps or slings for uneven loads to balance them properly.
- Lift smoothly: Avoid jerking the load. Always raise it slowly and steadily.
- Never overload: Exceeding the crane’s capacity can lead to serious accidents or equipment failure.
Movement with and Without Load
Moving the crane safely is crucial whether the crane is carrying a load or not.
With load:
- Move slowly and carefully. Make sure the load is secure and won’t shift.
- Always engage the brakes when the crane is stopped with a load.
- Be aware of your surroundings—watch for obstacles or people.
Without load:
- Use the crane for positioning and moving tools or equipment.
- Test the movement by pushing or rolling the crane before lifting the load.
- Ensure the casters are rolling smoothly and not obstructed by dirt or debris.
For safety, never move the crane with a load hanging too high off the ground.
Outdoor Operation and Wind Precautions
Outdoor environments can be tricky—wind is the biggest concern. Always consider these points if using the crane outside.
Wind speed:
- If winds exceed 20 km/h (12 mph), do not use the crane outside.
- Strong gusts can make the crane unstable, especially with a load hanging.
Secure the crane:
- Always engage the brakes if the crane will be stationary outdoors.
- If gusty winds are expected, consider using tie-downs or anchoring systems to prevent tipping.
Weather conditions:
- Be cautious in rain, snow, or ice—wet surfaces can make the crane slippery and harder to control.
- Avoid outdoor use in extreme temperatures if possible.
If the weather looks bad, it’s always better to delay lifting operations.
Operator Responsibilities and Safe Communication Protocols
The crane operator plays a key role in ensuring safe operation. Here’s what to keep in mind:
Before operation:
- Inspect the crane and make sure all safety checks are done.
- Ensure the work area is clear of people, equipment, or obstacles.
During operation:
- Communicate clearly with any ground workers or helpers. Use hand signals or radios, but always keep communication open.
- Maintain control of the load. Always keep the load at a safe height, and never leave the crane unattended with a load lifted.
After operation:
- Lower the load completely before turning off the hoist or moving the crane.
- Engage the brakes or lock the casters when the crane is not in use.
- Keep the area clean and make sure no one is near the crane during disassembly.
Good communication prevents accidents and keeps everyone safe.

Inspection, Maintenance, and Safety Checks
Regular inspection and maintenance are essential to keep your gantry crane running smoothly and safely. This section provides guidelines on what to check, how often, and what actions to take.
Inspection Intervals
To keep everything in top shape, follow these inspection schedules:
Daily Inspections:
- Perform a quick check before each use to make sure everything is in working order (as outlined in the operating instructions).
- This should only take a few minutes but can save you from major issues.
Periodic Inspections (Monthly or Quarterly):
- Look for wear and tear on key components like casters, welds, and hoist mechanisms.
- Check the stability of the frame and any moving parts.
- Clean parts like the hoist chain and trolley.
Annual Inspections:
- Have a qualified technician inspect the crane at least once a year for any signs of fatigue, wear, or damage that may not be visible during daily checks.
- These checks should include detailed examination of structural welds, hoist mechanisms, and electrical systems.
Key Inspection Points
When inspecting your crane, pay close attention to these critical components:
Welds and Frame:
- Check for cracks or signs of stress at welded joints.
- Look for bending or distortion of the frame that could compromise structural integrity.
- Ensure all components are properly aligned and firmly connected.
Fasteners (Bolts, Pins, Locking Mechanisms):
- Tighten any loose bolts, and check that pins are properly secured.
- Replace damaged or missing fasteners immediately to prevent failure during use.
- Periodically verify that locking mechanisms, especially on casters, are working as they should.
Casters and Mobility Parts:
- Check casters for smooth rolling, proper brake function, and signs of wear.
- Inspect for debris or dirt buildup that could obstruct movement.
- Verify that the brakes hold securely when engaged.
Beam Wear:
- Examine the I-beam for any signs of bending, scoring, or damage from heavy lifting.
- Ensure the trolley moves freely along the beam without resistance.
Hoist Integrity:
- Inspect the hoist mechanism, chain, and hook for any damage or corrosion.
- Check the trolley and hoist alignment to ensure smooth operation.
- Verify that the lifting mechanism is working properly during operation.
Cleaning and Surface Protection
To keep your crane in good condition, clean and protect it regularly:
Cleaning:
- Use a soft cloth or brush to remove dust, dirt, and debris.
- Avoid harsh chemicals that could damage the surface.
- For stubborn grime, use mild detergent and water.
Surface Protection:
- After cleaning, apply a protective coating to prevent corrosion, especially if the crane is used in humid or corrosive environments.
- For outdoor use, consider using rust-resistant paint on exposed metal surfaces.
Lubrication Guidance
Proper lubrication is essential for the smooth operation and longevity of your crane.
Lubrication Points:
- Hoist chain: Apply lubricant to the chain regularly to prevent rust and ensure smooth lifting.
- Trolley rollers: Lubricate roller bearings to ensure the trolley moves smoothly along the I-beam.
- Caster wheels: Use grease on the caster pivot points and locking mechanisms to maintain smooth rolling and effective braking.
Lubricant Products:
- Use high-quality industrial-grade lubricants recommended by the manufacturer.
- For chains, use chain-specific oil or grease. For roller bearings, multi-purpose grease should suffice.
- Avoid using too much grease, as it can attract dirt and debris.
Maintenance Records and Documentation
Keeping accurate maintenance records is essential for tracking the condition of the crane and staying compliant.
- Daily logs: Keep a simple record of your daily inspections, noting any issues that arise.
- Periodic logs: Document your monthly and quarterly inspections, including detailed notes on wear, part replacements, and lubrication.
- Annual inspection reports: Keep a copy of the certified inspection report from a qualified technician.
- Store these records in a maintenance logbook for easy reference.
Conditions Requiring Crane Removal from Service
There are certain situations where the crane should be removed from service to prevent accidents:
- Structural damage: If you notice cracks, bends, or serious corrosion in the frame, uprights, or I-beam, stop using the crane immediately.
- Hoist failure: If the hoist shows signs of malfunction, like jerky lifting or chain damage, do not use until it's repaired.
- Caster or brake failure: If the casters don’t rotate properly or the brakes fail, the crane should be removed from service until the issue is fixed.
- Overloading: If the crane is used beyond its rated capacity, remove it from service and inspect for damage.
Troubleshooting and Repair
Even with regular maintenance, issues can sometimes arise. This section helps you identify common problems and how to address them. Always remember, safety first—never attempt repairs while the crane is under load.
Common Problems and Fixes
Here are a few common issues you might encounter and simple fixes to try before calling for professional help:
Rolling Issues (Crane Doesn’t Move Smoothly)
Cause: Dirty or obstructed casters, or caster brakes not releasing properly.
Fix:
- Clean the casters and remove any debris that may be blocking movement.
- Check the caster brake and ensure it’s fully disengaged before trying to move the crane.
- Lubricate the caster wheels and locking mechanisms with an appropriate grease.
Hoist Failures (Hoist Not Lifting Properly)
Cause: Insufficient power, hoist misalignment, or damaged lifting mechanism (e.g., chain or motor issues).
Fix:
- Check the power supply (for electric hoists) and ensure the connection is secure.
- Inspect the hoist chain or rope for tangling, wear, or damage, and lubricate it if needed.
- Ensure the hoist is properly aligned with the trolley and I-beam. If misaligned, adjust the hoist position.
Trolley Misalignment or Jamming
Cause: Dirt, debris, or wear on the trolley wheels or I-beam.
Fix:
- Clean the I-beam and remove any obstructions that might cause jamming.
- Check the trolley wheels for signs of wear and lubricate them.
- If the trolley is out of alignment, adjust it to ensure smooth movement along the beam.
If these solutions don’t resolve the issue, it’s time to move to more detailed diagnostic steps or call for certified service.
Diagnostic Checklist
Use this checklist to help diagnose and resolve issues before deciding if professional help is needed:
- Is the crane moving smoothly? If not, check the casters, wheels, and track for obstructions or damage.
- Is the hoist functioning? Verify power connection, inspect the chain or rope, and ensure the hoist is aligned.
- Is the crane operating at its rated capacity? If overloaded, remove the load and inspect for damage.
- Are the brakes functioning properly? Test the locking mechanism and ensure it holds securely when the crane is stationary.
- Are there any unusual noises or vibrations? If so, stop the crane immediately, inspect the hoist, trolley, and casters for signs of wear or damage.
- Are the welds or frame components intact? Check for cracks or distortions. If found, stop using the crane and call for professional inspection.
Guidelines for In-field vs. Certified Service
Some issues can be addressed with basic tools and knowledge, but others may require professional attention. Here’s when to handle repairs yourself and when to call for certified service:
In-field Repairs:
- Simple fixes like cleaning, lubrication, or replacing bolts, pins, or fasteners can be done on-site.
- If you’re confident in your mechanical skills, you can realign the hoist or trolley and adjust minor parts.
Certified Service:
- If you find structural damage (like cracked welds or bent I-beams), the crane should be taken out of service until a professional technician inspects it.
- Hoist motor issues, electrical faults, or anything beyond basic mechanical repairs should be handled by a certified technician.
It’s always better to be cautious. If you’re unsure about how to fix an issue or if the repair requires special tools, contact the manufacturer or a certified technician.
Safety Warnings for Troubleshooting Under Load
Working with a crane while it’s under load is risky, and certain precautions must be followed:
- Never troubleshoot the crane under load: Always lower the load completely before inspecting or repairing the crane.
- Release all tension: Make sure the hoist is not holding any weight before starting repairs.
- Use lockout/tagout procedures: If working on electrical components or moving parts, ensure the crane is powered down, and all energy sources are locked out to prevent accidental activation.
- Use proper personal protective equipment (PPE): Always wear safety gear like gloves, steel-toed boots, and eye protection when working on the crane.
Safety is the priority—if the crane is under load, stop immediately and remove the load before continuing.
Parts, Support, and Warranty
In this section, you’ll find everything you need to know about sourcing replacement parts, contacting technical support, and understanding your warranty coverage.
Replacement Parts Guide with Part Numbers
To keep your crane operating smoothly, you may need to replace specific parts over time. Below is a list of common replacement parts, along with their part numbers for easy reference:
Casters:
- Part Number: GCR-001
- Description: Heavy-duty caster with locking brake.
- Compatible Models: All fixed-height aluminum gantry cranes.
Hoist Chain:
- Part Number: HC-002
- Description: 10-meter hoist chain for electric hoists.
- Compatible Models: Suitable for all hoist-equipped gantry cranes.
Trolley Bearings:
- Part Number: TB-003
- Description: Replacement bearings for smooth trolley operation.
- Compatible Models: All models with trolley systems.
Frame Bolts and Fasteners:
- Part Number: FB-004
- Description: High-strength bolts for frame assembly.
- Compatible Models: All models.
I-beam End Caps:
- Part Number: IEC-005
- Description: End caps for I-beam to prevent damage and dirt accumulation.
- Compatible Models: All fixed-height aluminum gantry cranes.
You can find these parts and more by checking the full parts list included in your manual or by contacting our customer service team.
Ordering Procedure and Lead Times
To order replacement parts for your crane, follow these simple steps:
Identify the Part:
- First, refer to the part number listed in the manual or consult the part you need to replace.
- If unsure, contact customer support with details about the issue and model for assistance.
Submit Your Order:
- You can place your order online through our website or contact our customer service team directly.
- Provide the part number, crane model, and quantity you need.
Lead Time:
- Standard Parts: Typically ship within 3-5 business days.
- Custom Parts or Large Orders: May take up to 7-10 business days, depending on availability and the size of the order.
Payment:
- Orders must be paid for in full before shipment. Acceptable payment methods include credit card, bank transfer, or company purchase orders.
Once your order is processed, you will receive a tracking number for your shipment. If you need expedited shipping, please inform our team during the ordering process, and we’ll do our best to accommodate your needs.
Warranty Coverage and Exclusions
Your crane is backed by a comprehensive warranty that covers defects in material and workmanship. Here's what’s included:
Warranty Duration:
- All components (except for consumables like casters and hoist chains) are covered under a 2-year warranty from the date of purchase.
What’s Covered:
- Defects in materials or workmanship that occur under normal use.
- Repairs or replacements for faulty components found during the warranty period.
What’s Not Covered:
- Damage from misuse or abuse, such as overloading the crane or using it outside of recommended guidelines.
- Normal wear and tear, such as wear on casters, chains, or bearings, that doesn’t affect performance.
- Improper maintenance or neglecting routine upkeep as outlined in the manual.
- External damage caused by accidents, weather, or external forces.
Claims Process:
- If you believe your crane is eligible for a warranty claim, contact our technical support team with details about the issue.
- We may request photos or video of the damaged part and a description of the failure.
- Once the claim is verified, we will send replacement parts or arrange repairs as necessary.
Note: You may be required to pay for shipping or any labor costs associated with repairs depending on the nature of the warranty claim.
By keeping track of your crane's maintenance and following the warranty guidelines, you can ensure the longevity and optimal performance of your gantry crane. For further assistance or if you have any questions, don't hesitate to reach out to us.